How long have you owned your Camera? A camera is just like any other appliance in your home (except of course, much smaller). It has moving parts and mechanisms, which must be kept free of dust particles, moisture, erosion, etc. In order to keep any appliance, which has moving parts, operating efficiently; you have to ensure that dust, moisture, or friction’s enemy: erosion, do not infiltrate in-between any of its moving parts!
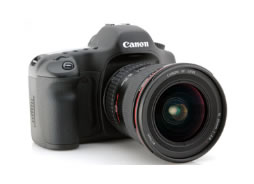
In this Article, it is our purpose to demonstrate how your DSLR Camera’s moving parts can over time become dirty (inside and out), due to general everyday usage. The most important question(s), you should ask yourself, with any of your equipment in your home or work life is:
This is true not only for your camera body, but also for your camera lens. All you have to do, to determine if any appliance needs to be cleaned is to ask yourself: “does this have moving parts”?
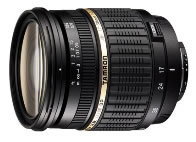
Of course, our lenses have rings which are moved manually to adjust focus, (whether or not, we typically use them); they do allow moisture, or dust particles into the minute spaces in-between.
Also, our camera’s body has various buttons, dials, rings, etc. which are manipulated to produce great photography. Each of these contains an opportunity for dirt particles to enter in and create erosion internally.
Camera Cleaning Kits Available
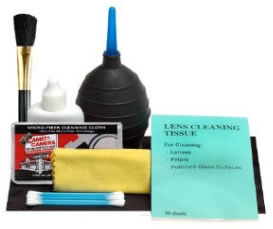
If you are purchasing your first new DSLR Camera with a regular 35-70mm lens; you may be entitled to a cleaning kit with your purchase. Heaven knows, DSLR Cameras and lenses are worth their weight in cost, but can be expensive in price, depending upon the brand and model you decide to purchase.
Why not, ask your sales person to include a cleaning kit as a “deal” of closing the sale? Remember, it never hurts to ask!
Of course, you do not need to spend inordinate amounts of money on expensive cleaning kits, when you can make you own kit, for less than $11.00. If there are cleaning kits available for $10.00 or less, you may want to consider your first purchase to be one, so that a few of the cleaning hardware pieces, you will now own for future cleaning needs.
CLEANING TOOLS TIP: For example, q-tips are easy to find in any home; you can purchase make-up brushes, chamois cloths and lens cleaning cloths at any dollar store; a small lens bellows is a great object you can make from an infant ear cleaning tool, to get the same great cleaning effect as what you see in this sample kit!
(D)SLR Camera - Internal View
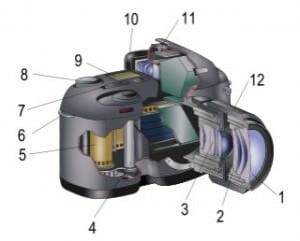
This is a great cross-section of a typical SLR camera, EXCEPT, that this illustration does not include the digital sensor or Pentaprism mirror sections; it demonstrates the older film SLR models.
We will use this illustration to demonstrate the various EASY TO VIEW components and then review the internal cross-sections of the newer digital components added to produce a DSLR camera!
The cross section of a DSLR camera differs primarily in internal component construction; where the film is replaced by a Pentaprism mirror assembly and its necessary hardware.
The DSLR camera uses an internal mirror assembly to reflect the image onto the view-finder. The viewfinder is the 2.5 display screen on the back of your DSLR Camera body.
This optical side-view of the internal components demonstrates how light (1) passes through the lens assembly and is reflected into the Pentaprism (7) by a mirror (2), which is angled at exactly 45° and moves upward and back into position with each photograph.
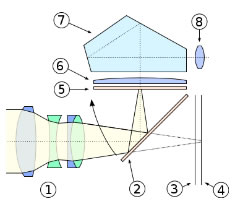
The image is first projected through the roof of the Pentaprism and back onto a matte focusing screen (5), through a condensing lens (6). When the image is viewed through the eyepiece (8), regardless of whether it is in-focus or not, the focal plane shutter (3) opens (by operation of a shutter button) and the image is captured on the digital sensor (4). When the shutter closes, the photo image is saved internally.
HOW – TO Clean DSLR Camera Body & Lenses
Any dirt, when brought into contact with fingers, rain, dust, other airborne particles and atmospheric moisture; eventually will seep into the cracks and crevices, between the lens or camera body’s rings, dials and set up shop inside. Any of these minute particles will create spots, scratches, or blurred images across your photograph; a great clue that your camera and/or lens needs cleaning.
HOW TO CHECK IF CAMERA NEEDS CLEANING TIP: First, set your camera to a small aperture and take a picture of a white piece of copy paper. Then transfer the photo to your computer, by USB cable and open the picture for viewing on the computer screen. Zoom in to view any spots, scratches or other abnormalities of the photo image. Alter the contrast of the image, darker to see if any blemishes begin to stand out more. If you see any spots, scratches, etc. it’s time for a cleaning!
Step 1 - Remember, all digital lenses are made of GLASS! The sharpness and clarity of your photo images, greatly depends on each lens (including the entire camera body) being squeaky clean and free of any dust, sand, or other particles. The most important tool, every photographer should carry in his/her camera kit is a softy lens cleaning cloth. I am not talking about a washcloth from your closet, or even a paper towel. You need to keep a small and inexpensive camera lens cleaning cloth with your camera kit, at all times!
Using a microfiber cloth, clean off the exterior of your camera body and lens first. Also, make sure to clean around the lens amount carefully with q-tips and cleaning solution to ensure that no dirt particles can get inside the camera body or lens, when we detach the lens mount.
Step 2 - Be sure to clean the front glass on the Lens with the cloth, as you clean the exterior of the camera. Always keep a cap on your lens mount or glass surface to avoid potential future particles to enter the mechanisms.
Step 3 - Using the small air blower you have made or purchased, clean around each crack and crevice of the lens’s rings and dials. DO NOT USE A COMPRESSED AIR CANISTER! Then take a small amount of cleaning fluid; add it to the cloth (NOT THE LENS ITSELF), and gently clean the glass on the lens and the entire exterior surface of the lens. Be sure to wipe away any excess fluid.
Don’t use Windex either. Take the time to pick up Camera Cleaning fluid at any camera shop or electronics store. Keep it and new soft lens cloths on your kit and clean your equipment, each event at which you are shooting. Just like in any other business atmosphere, you need to keep your tools clean and ready for the next period of operation.
Step 4 - Once you have ensured that you are working in a dist-free environment, you will remove the lens mount so that we can clean the camera body digital sensor. We want to be sure to clean gently around the inside of the camera body, after we have removed the lens mount to ensure that we do not damage any part of its moving mechanisms.
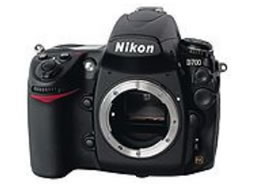
Step 5 - One of the greatest things about owning a DSLR Camera, is that you can change the lenses as often as necessary for different project shoots. During those lens changes, however, there is a risk of dust falling "onto the sensor." In fact, the CMOS or CCD sensor is covered by a color filter or a clear glass plate, so really the dust has fallen on something that is covering the sensor. Nonetheless, you want to be very careful at this point, because if anything near the sensor is scratched, the camera needs to go in for professional service!
Step 6 - READ FIRST, DO LATER; should always be your motto with expensive camera equipment. Be sure to take a few minutes to review your camera’s manual for cleaning instruction, to ensure the model you own does not have specific or unique instructions, designed for that exact model and make of camera. Also be sure to roll-up your sleeves so that no fibers from the shirt can get caught into the camera body.
BE SURE TO SET YOUR CAMERA MODE to SENSOR CLEANING mode! Also be sure that the camera power is on and the camera is fully charged. You may want to plug in your AC adapter at this point just to be sure the camera is in the ready, cleaning position. If the power goes off, the shutter curtain will close and become damaged if you have cleaning equipment inside the shutter’s curtain to clean the sensor.
Step 7 - Once the camera has been placed into the sensor cleaning mode, the shutter curtain will open and reveal the digital sensor. Using your small bellows; blow air onto the digital sensor’s defensive filtering element which is exposed. DO NOT TOUCH THE FILTER WITH THE TIP OF THE BELLOWS, AS IT WILL DAMAGE THE ELEMENT.
Step 8 - Once you have used the bellows to detach any loose dirt particles, you can take your clean brush and gently sweep the surface. Finally, you need to read the instruction manual once more to ensure you have the correct size of cleaning swab, and take two drops of cleaning solution; apply it to the swab, not to the camera body and gently sweep the swab from left to right in one direction across the filtering element’s surface.
REMEMBER: First use the bellows, then gently sweep with the brush, then use your cleaning solution and correct size of swab to clean the surface in one direction to extract any hard debris from the mechanism’s surface. BE GENTLE AT ALL TIMES. Use each side of the swab only once when swiping the element’s surface Throw away and get a new clean swab to repeat as necessary to clean the surface.
Step 9 - Finally, once the surface is clean, exit the cleaning mode on the camera and refit the lens onto the camera body. Now, you only need to repeat the “HOW TO CHECK IF YOUR CAMERA NEED CLEANING TIP” and see if you have removed all the blemishes!
If dust continues to show up, you need to repeat the cleaning process. If after cleaning the camera and lens a second time, there still appears to be scratches or blemishes, you need to seek professional care for the camera. REMEMBER to check the front of the lens to ensure that no scratches have blemished its surface.
DSLR Camera lenses are quite expensive and need to be kept in a strapped position in your camera kit. Do not allow your lens to lay loose in the bottom of the camera backpack or kit, as that is a sure bet to attract dust particles inside. Also keep a cap on your lens at all times, when it is NOT in use!
The same goes for your camera body. If you have removed a lens and you are going to set the camera body down, while you perform other operations; the lens mount must be covered at all times, when it is not attached to a lens.
Be sure to take special care with your camera body, lens, camera hardware and cleaning equipment. Keep your pack or kit clean at all times! DO NOT PLACE FOOD OR DRINK into your kit or backpack with the camera equipment. It is a sure-fire recipe for disaster!
Comments